Queues
The order queues track available statuses and steps for orders in the dispensing process. This guide provides an explanation of each queue, its associated status, and how orders are generally expected to move through the system.
The Queues section captures the order life cycle of the Dispensing side of the app. This includes when an order initially enters the system to its completion, after delivery or pickup. The order queues capture incoming requests, verification checks, problems, and shipping statuses.
Orders move from one status in the queue to another after fulfilling various requirements. As the requirements for each status are met, an order moves forward in the queue to the next stage. Alternatively, orders may move backwards to a previous status if there is a problem that needs resolution.
For questions and troubleshooting, refer to the relevant status to better understand the default criteria for each status and which actions impact an order, depending on its position in the order life cycle.
To do:
This first draft covers Draft to Pending Payment
Confirm: How technical should the document be? Do we want to include status changes at the code level or focus on the user experience?
Confirm: How different will the process be for individuals (patients) vs. businesses?
Fills vs. Orders
The statuses in the order queues apply to orders. Each order may include one or more fills. By default, the fill with the earliest position in the order queue determines the order status.
flowchart TD
	A(Order)
	A --> B(Fill #1)
	A --> C(Fill #2)
	A --> D(Fill #3)
As an example, imagine an incoming order includes three fills. Two of the fills have reached the Pending Payment status after passing the PV1 Event Verification checklist. However, one of the fills had a problem in the PV1 stage. Since one fill included in the order requires resolution, the entire order reverts to Incoming Queues status until the pharmacist or technician resolves the issue. (To do: Confirm appropriate example role or roles here.)
At certain stages in the process, orders with multiple fills appear as an individual order, such as Order #2. In other statuses, each separate fill appears individually in the queue, such as Fill #3. This depends on how the system fetches the order data, according to the unique needs of each status.
 Order 39 contains two fills, but appears as a single item on the Incoming Queues page.
 Once in PV1 status, Order 39 appears twice, with each fill listed on its own row in the queue.
Available Statuses
Status | Description |
|---|---|
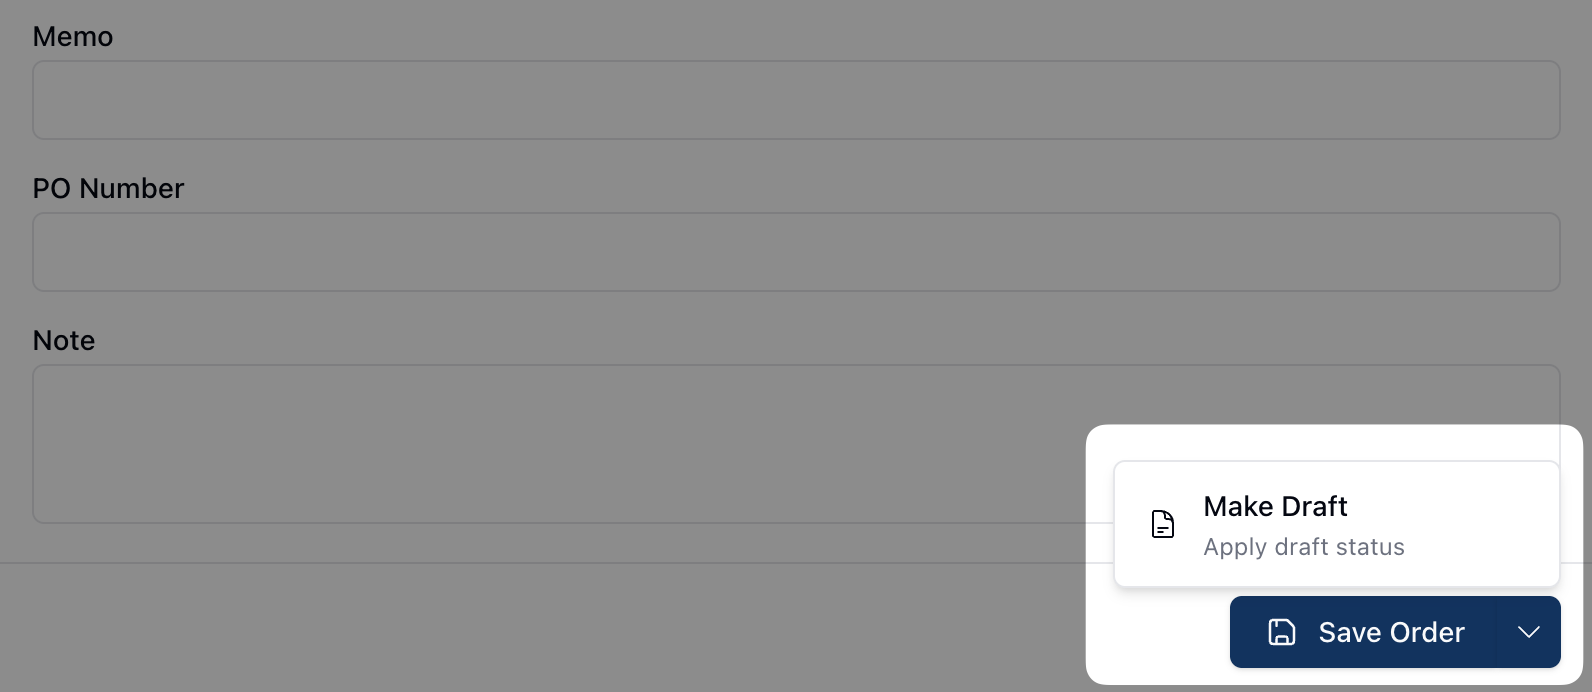
Draft | You can manually mark an order as a draft using the Make Draft button. Until draft status is removed, you can save the Order Information, but can't move the order to any other status. Actions:
|
Incoming Queues | Default status. All orders begin in the Incoming Queues. A technician checks each order for completeness before submitting it for pharmacist verification (PV1). Actions:
To do:
|
PV1 | Once an order meets all of the intake requirements, the reviewing technician can then submit it for pharmacist verification. These orders appear in the PV1 queue for a pharmacist to complete the related Event Verification checklist when on the Prescription Verification page. Actions:
To do: Is "completeness" the most accurate term for what we're looking for in the Incoming Queue verification? |
Pending Payment | Once an order passes PV1, it moves to the Pending Payment queue. Payment may be taken over the phone or via Text to Pay. In the case of payment via a company or B2B contract, an invoice is generated and sent based on the company's communication and invoicing preferences. Actions:
To do:
|
Compounding Needed | Orders with payment completed move to Compounding Needed if:
Once an order moves to the Compounding Needed queue, it also appears in the Compounding section of the app. It remains in this queue until the creation of a new formula lot and/or the medication becomes available for dispensing. Actions:
|
Ready to Dispense | Orders move into the Ready to Dispense queue under two circumstances:
|
PV2 (To do) | |
Ready for Shipping (To do) | |
Shipped (To do) | |
Complete (To do) |
Potential other statuses: Pending Authorization, Rejected, On Hold, Order Canceled, Ready for Pickup
To do: Pulled from the doc in ClickUp for background information. Are any of these still relevant?
Draft
 By default, all orders begin in Incoming Queues status. However, it's possible to manually override Incoming Queue status by changing the order to a draft.
To change an order to draft status, click the arrow next to the Save Order button and select the option to Make Draft. Orders in draft status retain all the information already saved to the order. However, draft orders can't move forward in the queue until draft status is removed.
You can remove draft status by clicking on the arrow to the right of the Save Order button and clicking Remove Draft. Once removed, you can then move the order to Incoming Queues status, as long as all other intake requirements are complete.
Note that not having draft status is also a requirement for moving the order to the Incoming Queues and PV1 status.
Incoming Queues
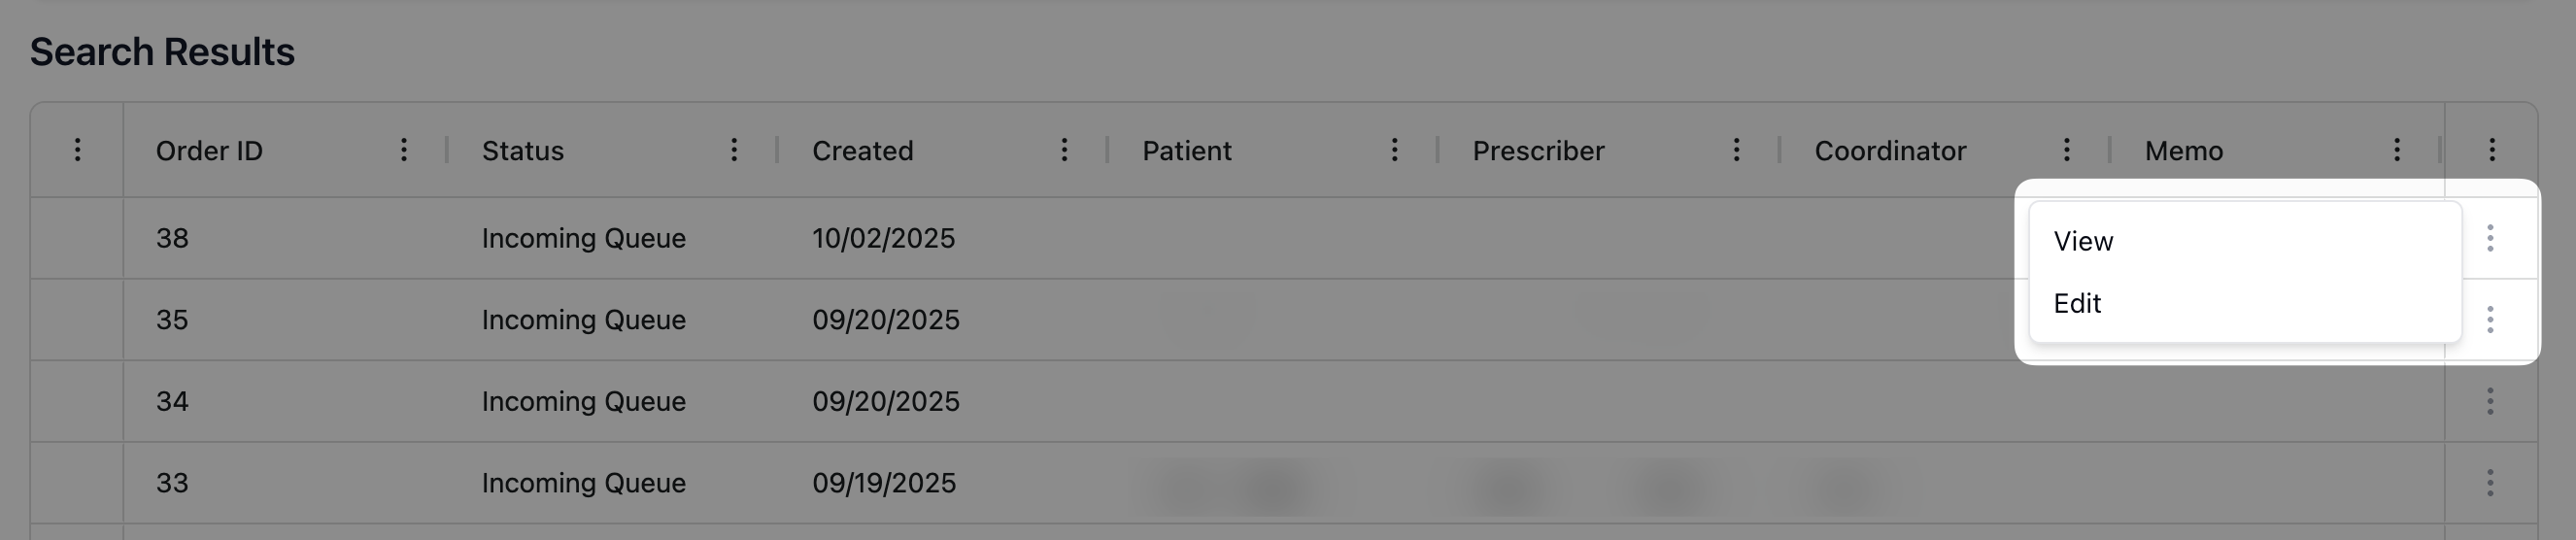
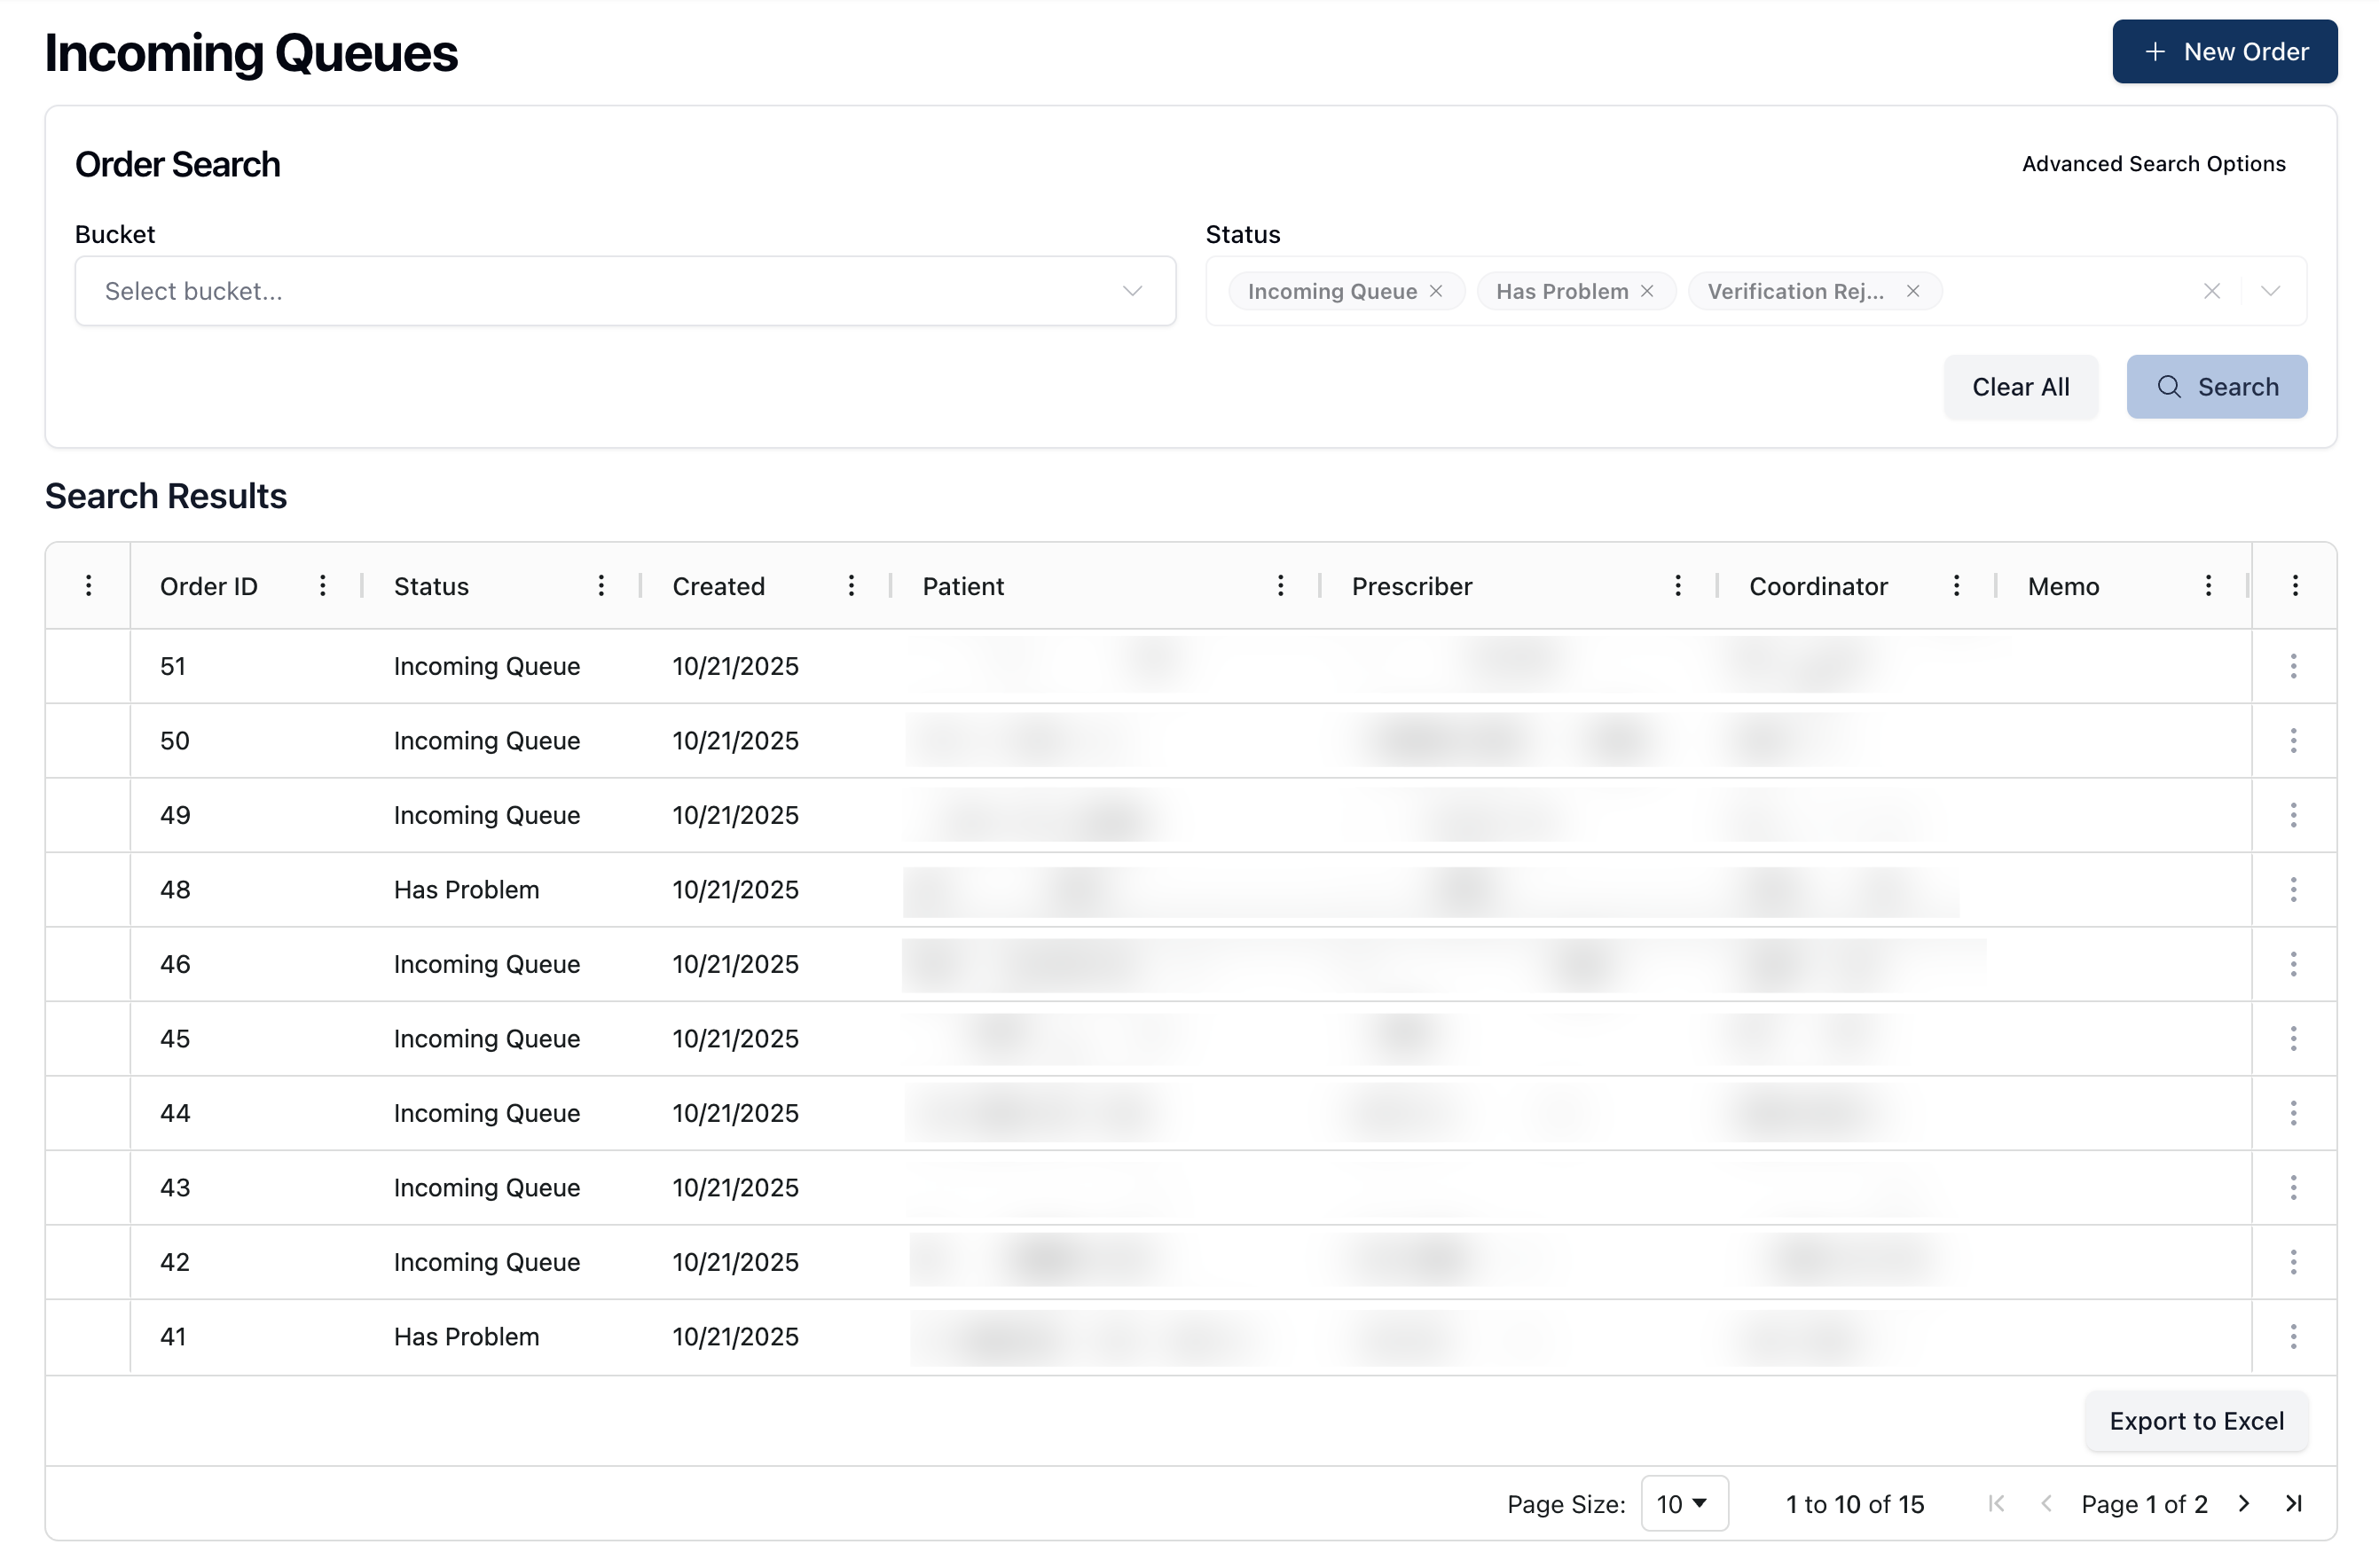 Incoming Queues is the default status for all orders. Orders can enter the Incoming Queues via multiple methods, including manual entry and e-Fax. Each order appears on its own line and clicking the actions menu ( ⠇) to the right of each item opens the option to either View or Edit the order.
 Orders remain in Incoming Queues status until they meet all minimum intake requirements. When on the Edit Order page, a widget at the bottom of the page displays any missing requirements, such as the patient, prescriber, payor, and prescription. You can add any missing intake requirements via the order Edit page.
Certain fields must be completed first before additional required fields become available. For example, you must add Patient, Prescriber, and Document Type information before it's possible to access the Payor tab. Additional required fields include the Prescription and Prescription Document.
To do: Confirm expectations. When I tested, it seemed like all three had to be filled before the other became available.
Once all information is complete, a green Submit for Verification button appears at the bottom of the page. Clicking this button moves the order to PV1 status.
Has Problem or Verification Rejected
 In addition to incoming orders, Incoming Queues status is also applied to orders that didn't pass the PV1 Event Verification checklist. Rejected orders in this queue appear in a pale red color and display a red warning icon to the left of the order. These visual indicators aim to reinforce that the order has a problem that must be resolved before moving to the next stage.
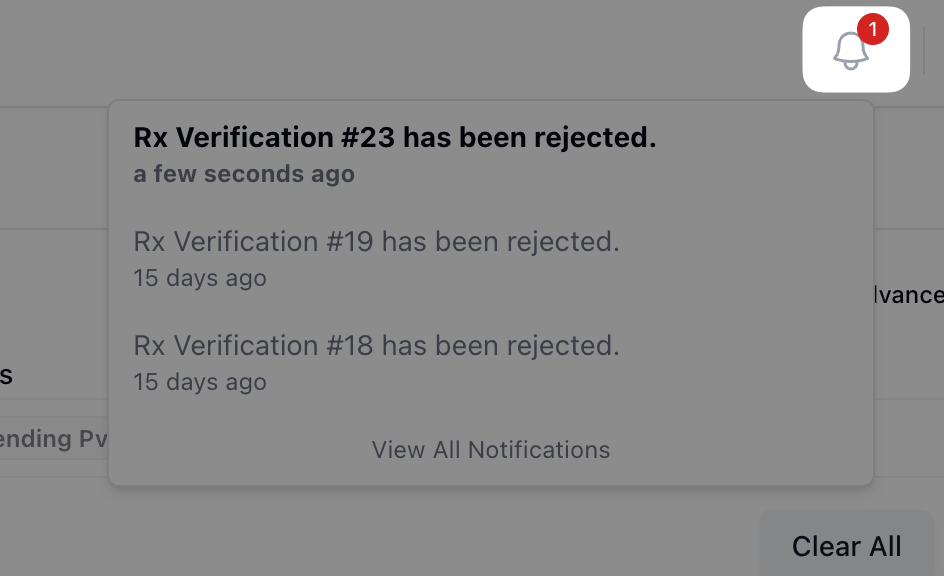
Rejected orders include a reason for the rejection on the order page. Additionally, rejected orders trigger a notification to the assigned technician or pharmacist, displayed in the notifications section of the app.
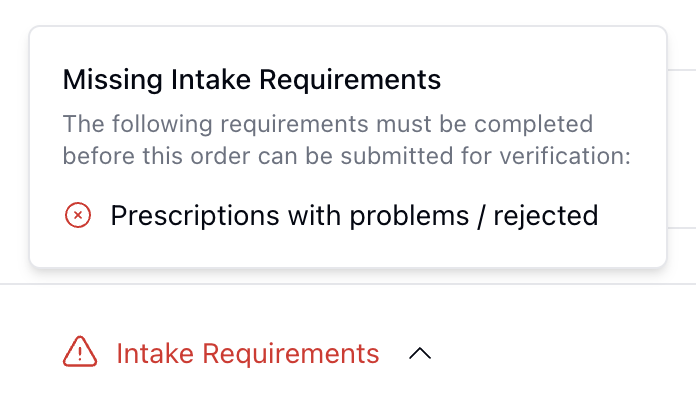 When the order returns to Incoming Queues status, it must be re-reviewed and fixed prior to moving to the PV1 queue once more. Rejection reasons appear in the Intake Requirements widget at the bottom of the page. For issues with prescriptions, the rejected prescription displays a Rejected badge to assist in identifying the issue.
Once all issues are resolved, a green Submit for Verification button appears once more to move the order and related fill(s) to PV1 status.
PV1
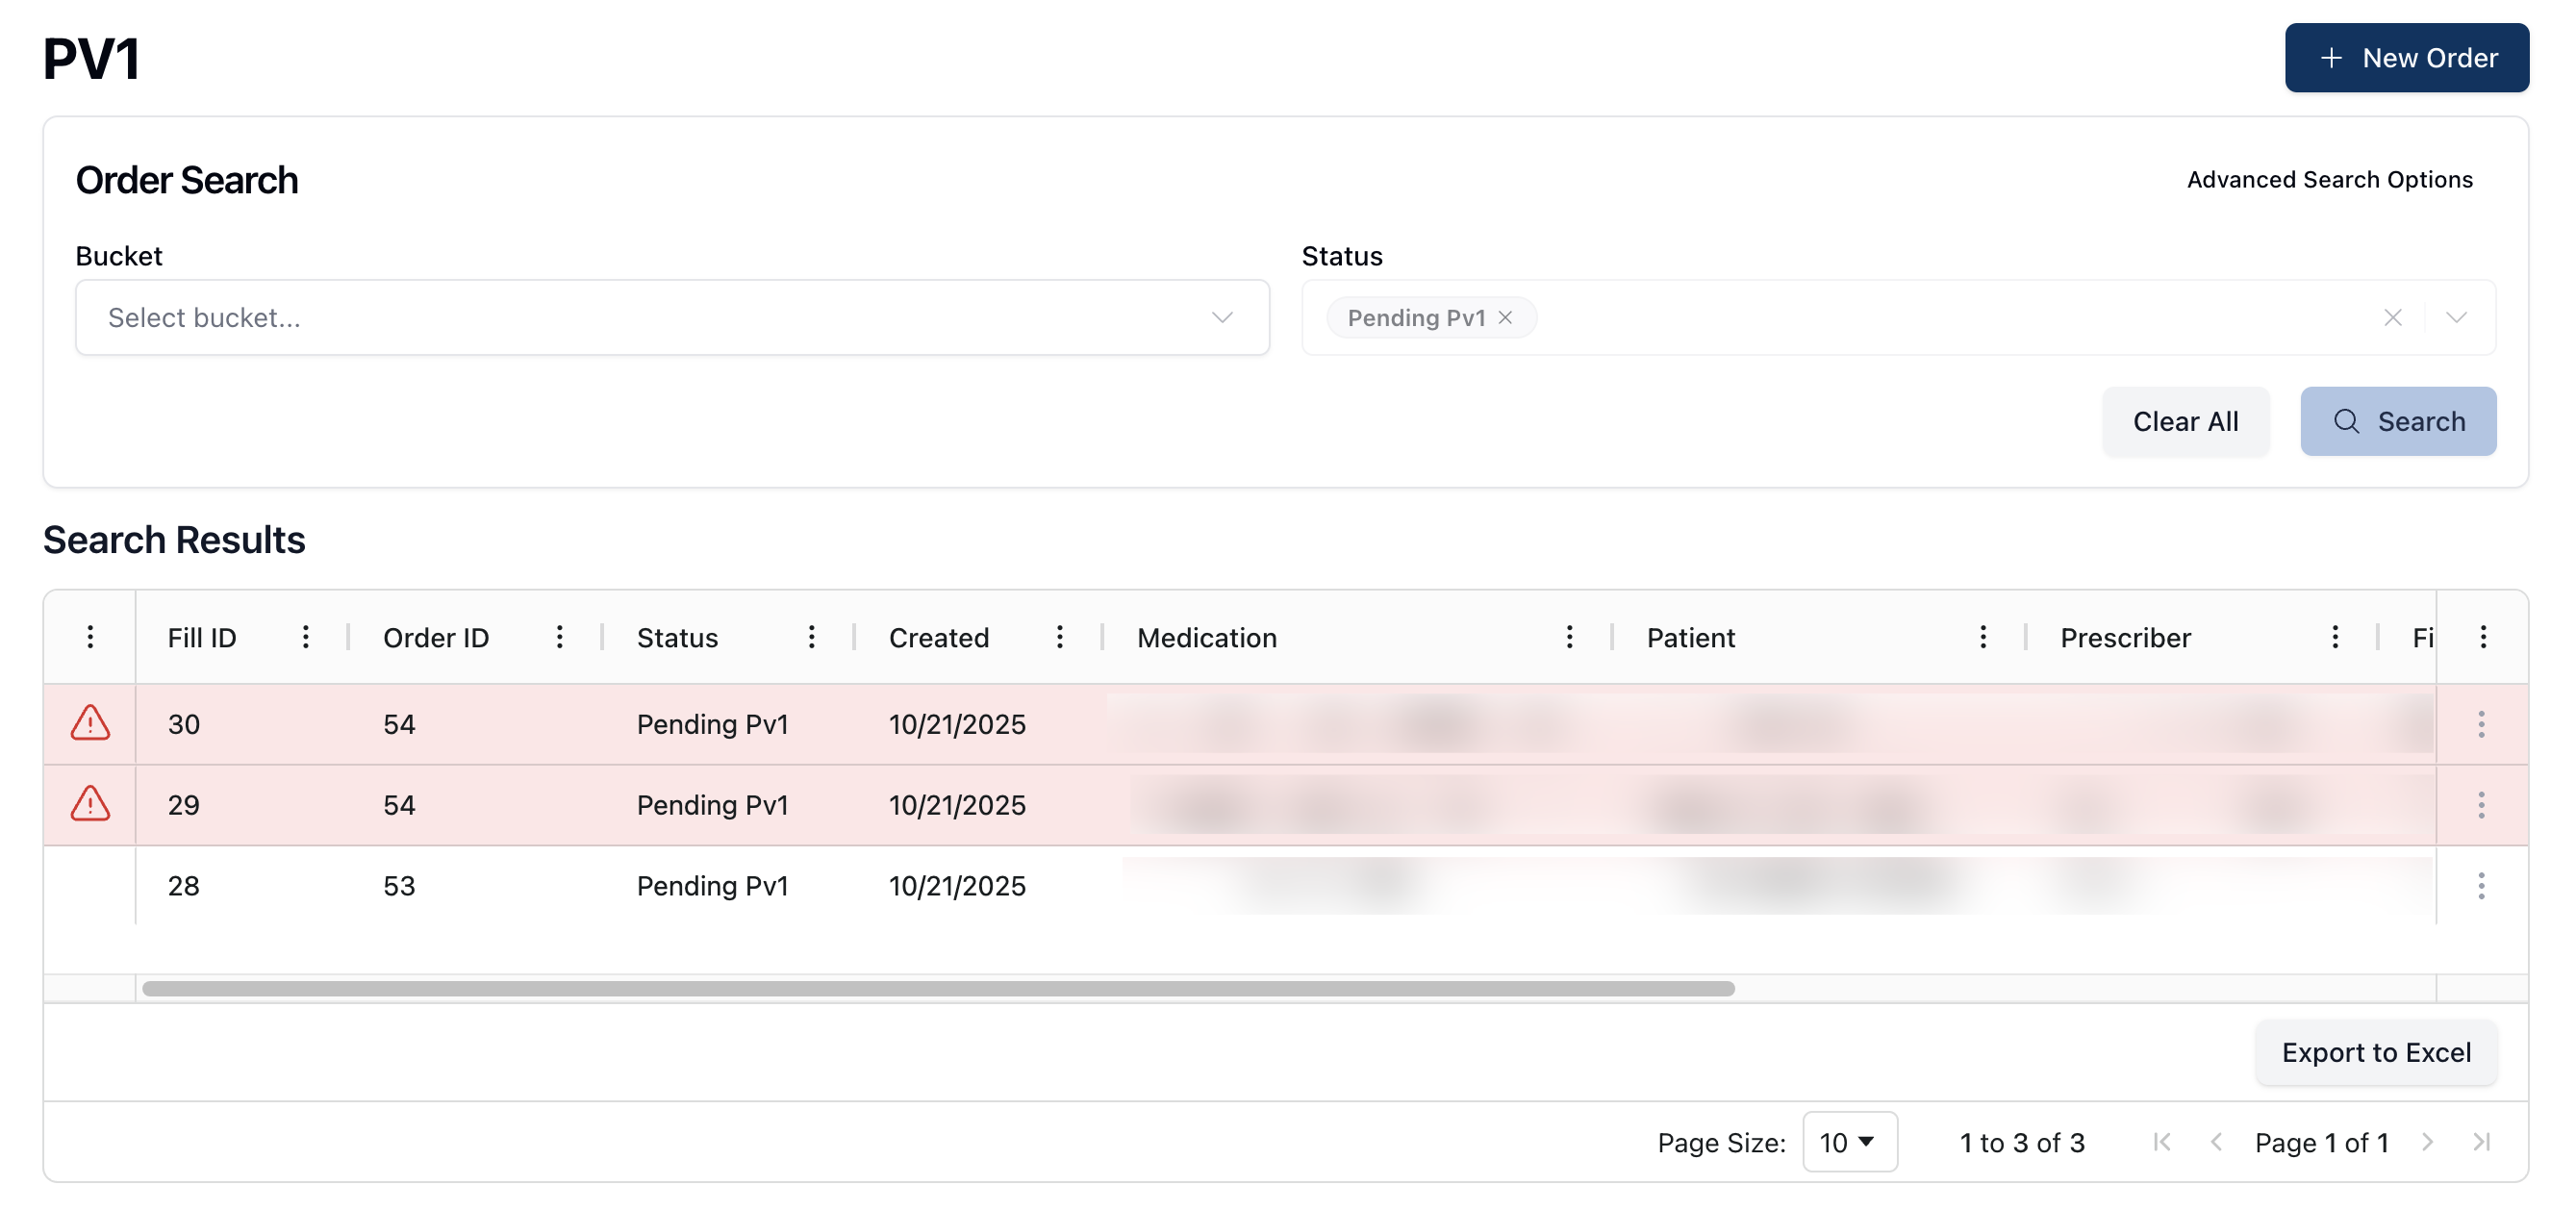 Orders in the PV1 queue require pharmacist verification prior to accepting payment for an order. As such, this queue is only visible to pharmacists. For more information, visit User roles and permissions.
This stage includes an Event Verification checklist. Each item in the checklist needs a pharmacist review before moving forward. Though this checklist may vary per pharmacy, there is a set standard of checks based on pharmaceutical standards set at the company level.
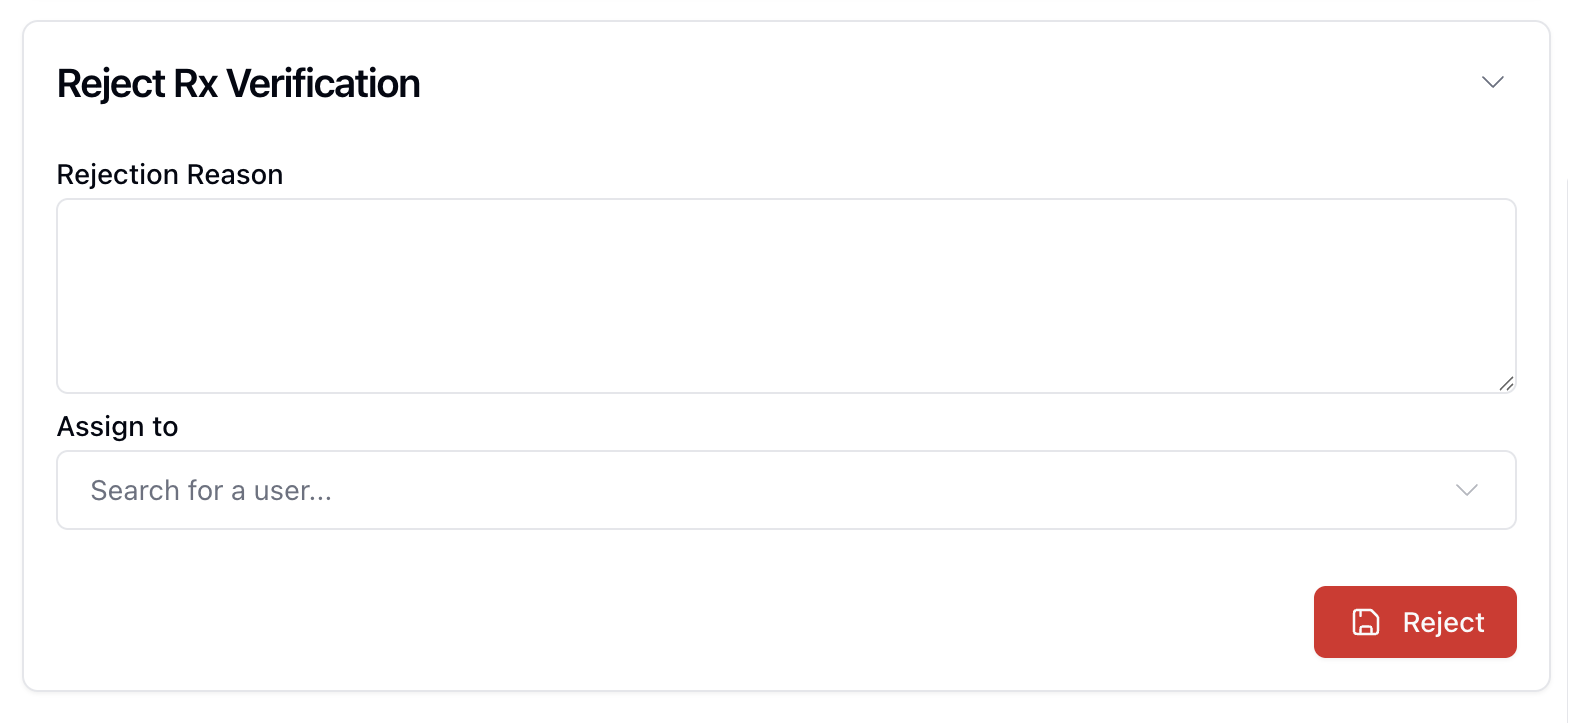
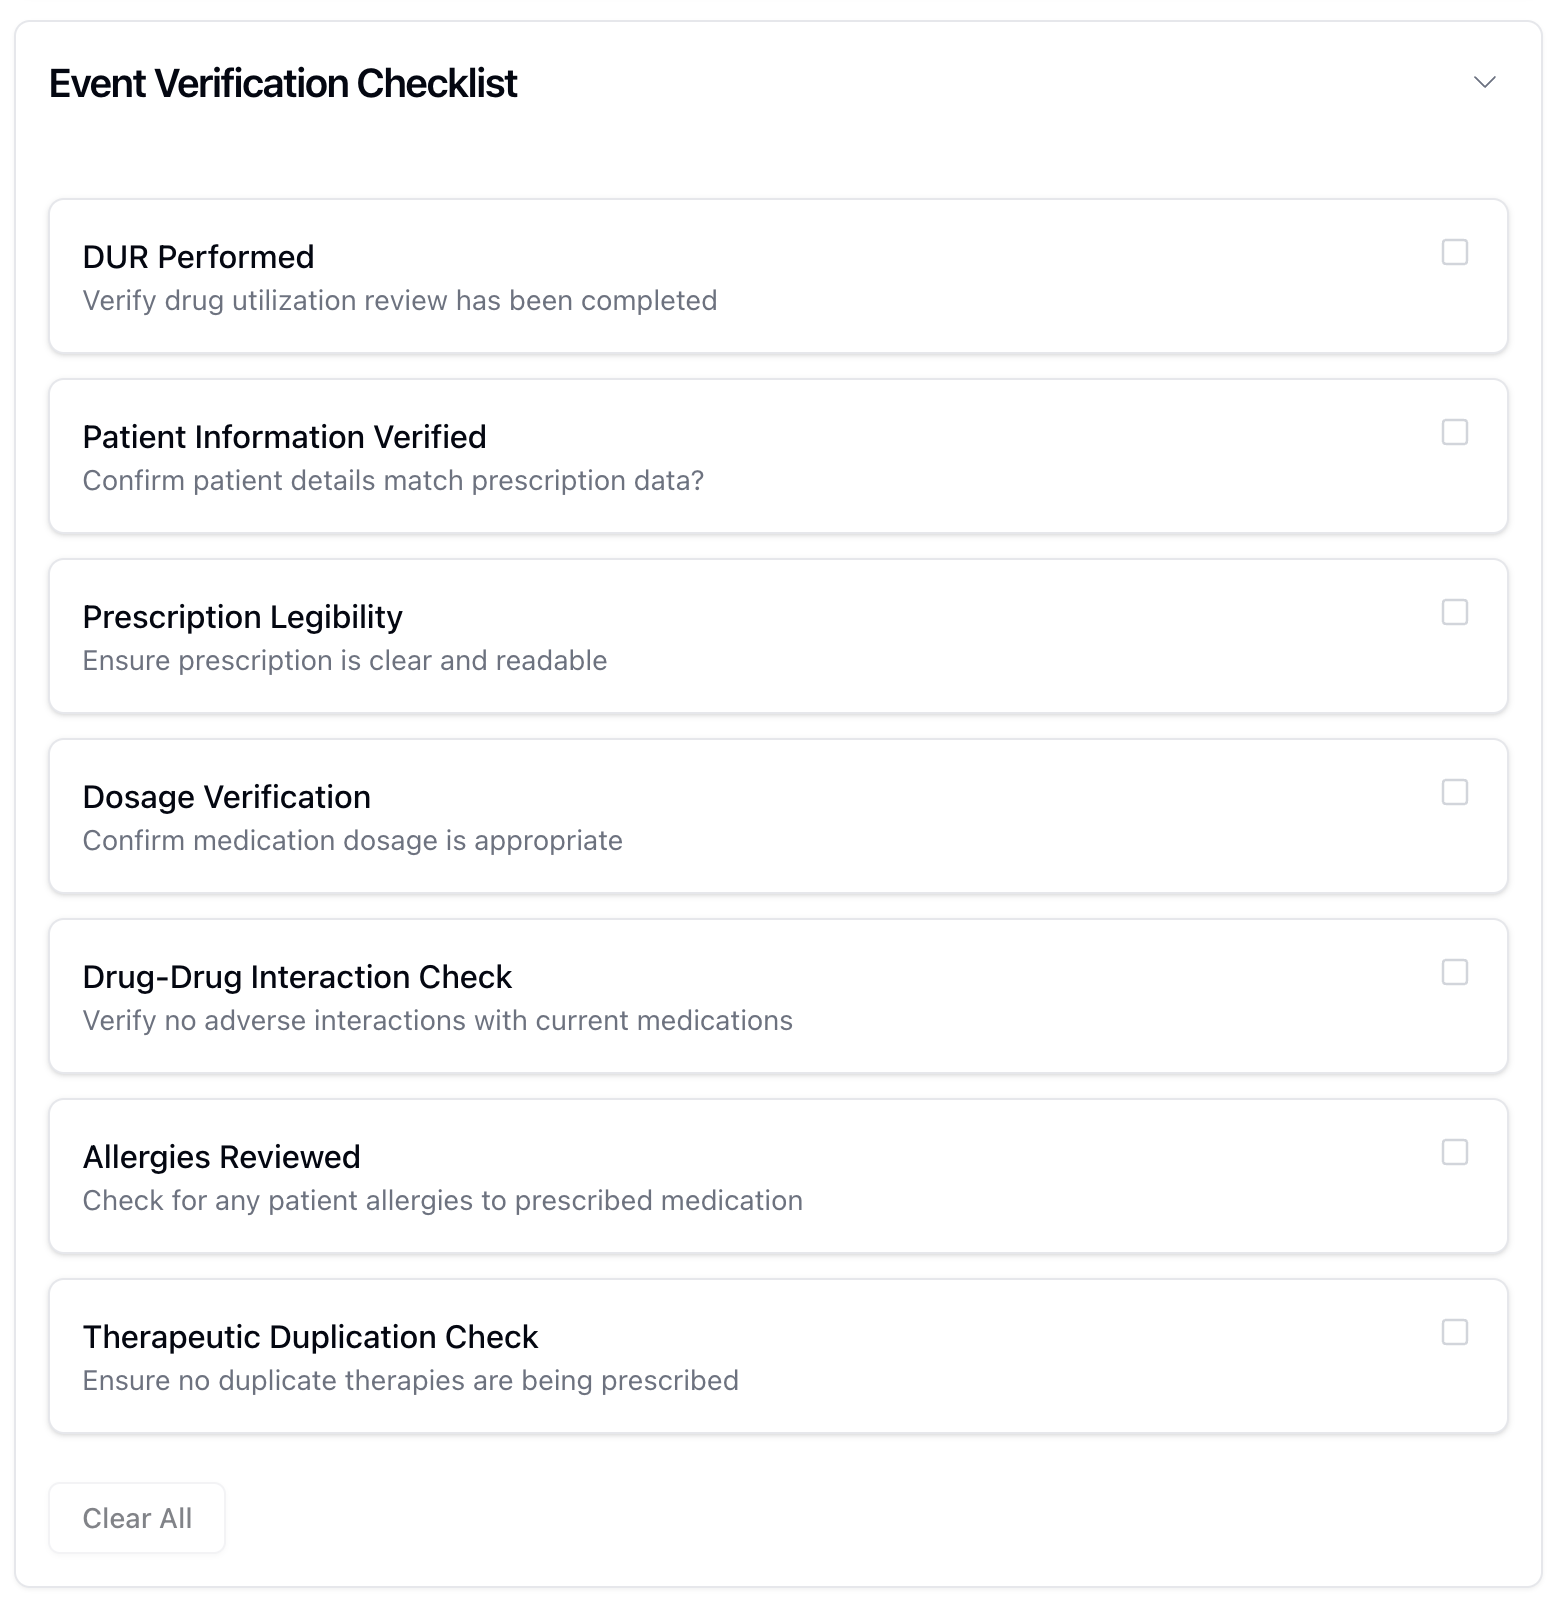 The Event Verification checklist applies to each fill in an order. As such, items in this queue are displayed as individual fills. As the pharmacist moves through the Event Verification checklist, they can click the Reject button if there is an issue with the fill at any point in the process. Clicking Reject opens a Reject Rx Verification form where the pharmacist adds a reason for the rejection.
Once a fill is rejected, it returns the order to Incoming Queues status.
When a rejected order enters Incoming Queues status, it's flagged as rejected and appears in a pale red color. The relevant issues must be resolved before being able to submit the order for verification once more.
After returning to the PV1 queue, the Event Verification checklist for the related fill retains the previously completed steps. Additionally, a new checklist item appears under the Event Verification checklist, asking the pharmacist to confirm that the original issue is fixed.
 Until all checklist items are checked, the Reject button is the only action available at this stage. Once the full checklist is complete, the Verify button appears, allowing the pharmacist to move the order forward to Pending Payment.
Note that if the order contains more than one fill, the order only appears in Pending Payment after all fills have passed PV1 status.
Pending Payment
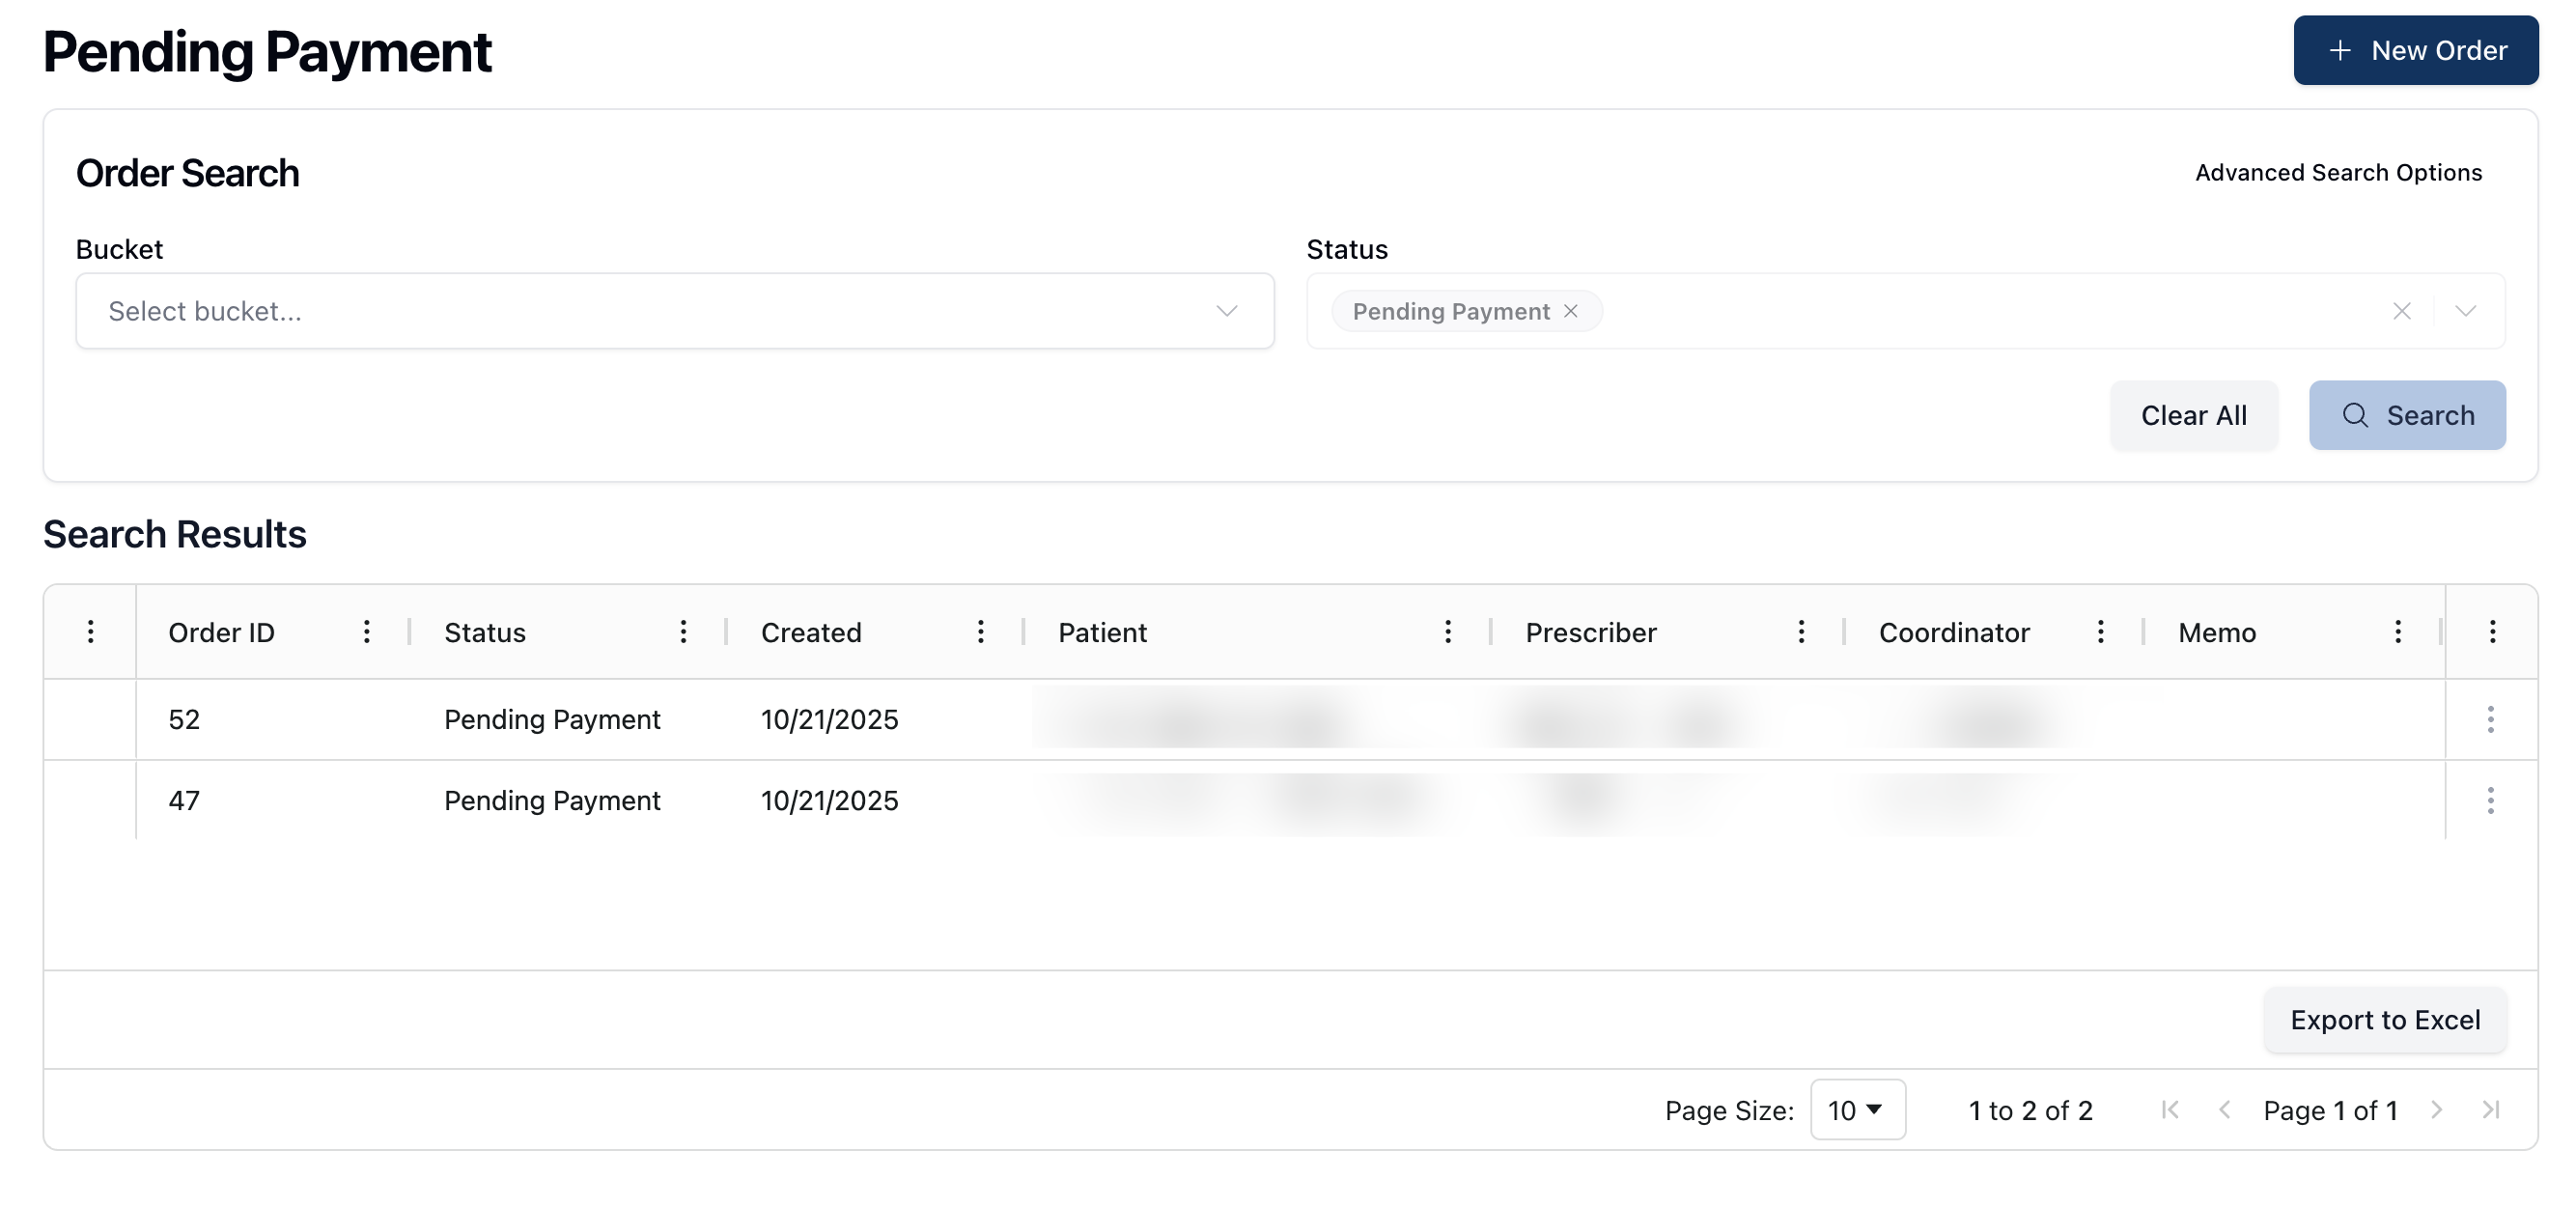 Once an order has passed the PV1 stage, it moves to the Pending Payment queue. Orders stay in the Pending Payment queue until payment is received, after which the order moves to Compounding Needed or Ready to Dispense.
Orders in the Pending Payment queue require shipping information, such as pickup or delivery. If Pick Up is selected, the Delivery Method section collapses, removing any fields for shipping address input. For orders delivered via Shipping, a valid shipping address and shipping option are required before it's possible to complete the next steps.
Orders in this queue also require a confirmation regarding Pharmacist Consultation, which may be accepted, denied, or marked as not applicable.
Once all the required fields are complete, the Submit Payment button appears active. After the payment goes through successfully, the order moves forward to the next step in the dispensing process. At this point, the process diverges depending on whether the requested medication is in stock or if it needs compounding.
To do:
What's the workflow when an order moves to this queue? For example, do all patients/companies receive a Text to Pay option or does it check preferences?
What happens if a payment fails?
What happens if a patient prefers to pay at pickup?
Pending HSA logic (TBD)
Compounding Needed
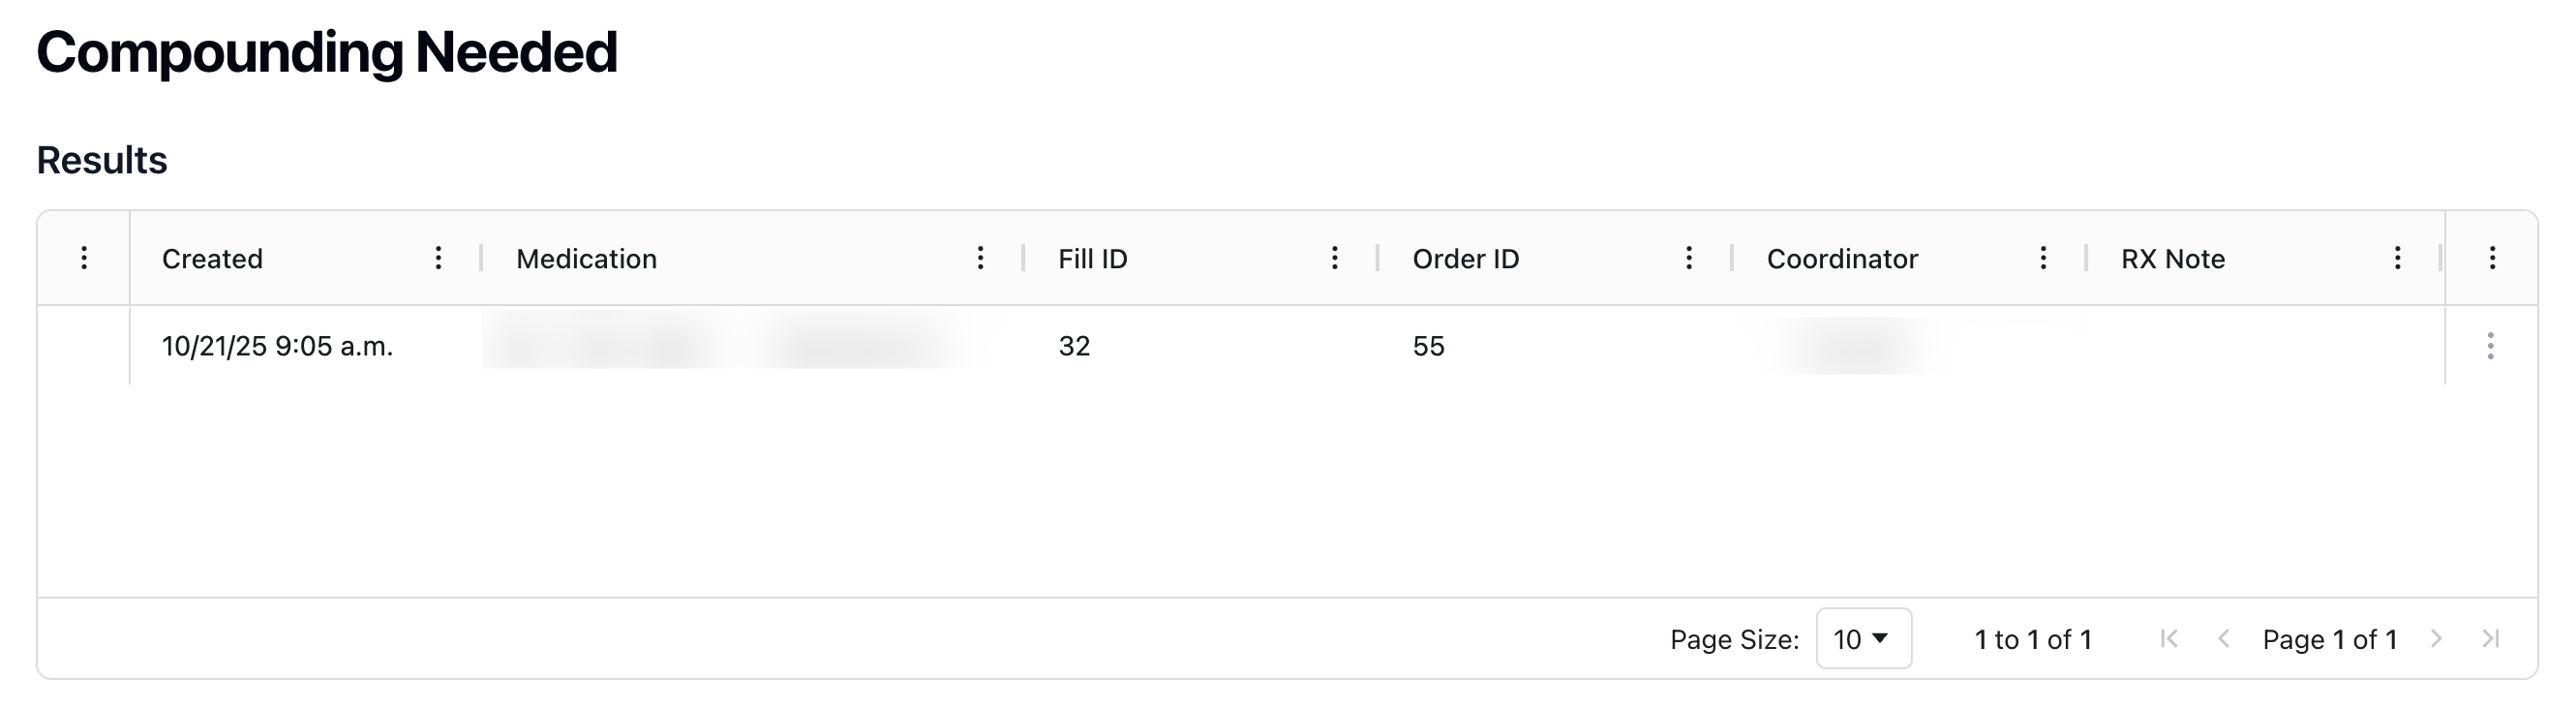 After a successful payment, the system checks if the requested medications are in stock or if they need compounding. If the medication is in stock, the order moves to the Ready to Dispense queue. In the case that the medication needs compounding, the order moves to Compounding Needed status.
Orders in the Compounding Needed status appear in two places: Queues > Compounding Needed in the Dispensing dashboard and Compounding Needed in the Compounding dashboard.
Orders stay in Compounding Needed until a new lot is created, switching the medication to in stock. From the Compounding dashboard, each item in Compounding Needed includes an actions menu ( ⋮ ) with the Create Log Entry option.
Selecting this option opens the Making Log form for the related formula. Once the pharmacist completes the log, the inventory for the related medication increases according to the quantity made. This triggers the medication as In Stock.
Once compounding is complete and the medication is in stock, the order automatically moves to Ready to Dispense.
To do:
Confirm terminology for compounding (only pharmacists completing the log?)
Confirm logic for move to Ready to Dispense - is there any manual action that's needed here, or just the log creation?
Ready to Dispense
To do
PV2
To do
Ready for Shipping
To do
Shipped
To do
Complete
To do
Process Overview
flowchart TD
	A[Draft]
	B[Incoming Order]
	B --> O{Order valid?}
	O --> |Yes| C[PV1]
	O --> |No| L[Rejected/Has Problem]
	L --> B
	C --> P{Event Checklist completed?}
	P --> |Yes| D[Pending Payment]
	P --> |No| L
	D --> Q{Payment completed?}
	Q --> |Yes| R{Item in stock?}
	Q --> |No| M[On Hold]
	R --> |Yes| F[Ready to Dispense]
	R --> |No| E[Compounding Needed]
	E --> S{Lot created?}
	S --> |Yes| F
	S --> |No| M